
Many people who visit the outdoors are like astronauts. They carry their life support system with them in their backpacks. Shelter, water, food, and warmth are all provided by what they carry on their backs. If a calamity separates them from their packs, they instantly find themselves in a dangerous survival situation. They become fish floundering on dry land, ill-equipped (literally) to survive in their natural environment.
Bushcraft is the practical knowledge of the natural world. It not only enriches our outdoor experience, it bestows very practical skills that allow us to use natural materials to meet our survival needs. This provides a crucial fallback should we become separated from our modern outdoor equipment. In addition, we carry bushcraft in our heads not on our backs. So it travels with us wherever we go. It is always at the ready and does not weigh anything.
Overview
This post describes how to build a debris hut. It is a simple shelter you can construct from natural materials. Crucially, it does not require any special tools or equipment to construct. It provides protection from the elements and is simple to build. A primary feature of this shelter is that it works without need of a fire to warm it.
Debris huts can be used effectively in a many environments. Two areas where it is inadvisable to use a debris hut are in an alpine setting and in the jungle. In an alpine setting there is no wood to construct one. In the jungle you do not want to sleep on the ground. With that said, a debris hut can be adapted to a jungle environment if there are no other options.
Everyone should try building a debris hut. It is fun and an important skill. National forests are good places to go where you have both the natural setting and requisite materials. When you practice, be sure to use only dead materials. Also be sure to deconstruct the shelter when you are done. Returning the area to its natural condition allows future visitors can enjoy the forest. It is also important for safety. Aging shelters pose a risk of collapse to children who might explore them after we leave.
Principles
The debris hut functions by insulating you from the elements using layers of natural material. Layers of leafy material on the outside shed rain and block wind. This provides a bubble of air inside the shelter that is warmed by your body heat. For this reason debris shelters should be built as small as possible. You want your body to heat only the space required to keep you warm. If the shelter is too large, you will be cold because your body is unable to warm such a large volume of air.
The time of day you start to build your shelter is very important. Begin work the moment you decide to spend the night outdoors. They often take three to four hours to construct. So start well before sunset. Notice this implies a timetable for decision making should you become lost in the wilderness. If you are going to build a debris hut, you must make the decision to start construction when you have enough time to complete it before darkness falls.
Debris huts take a large amount of energy to construct. It is worth repeating: Debris huts take a large amount of energy to construct. The calories you burn constructing your practice shelter will greatly affect your thinking about what man-made materials to take with you on your next day-hike.
Site Selection
Location, location, location! Site selection is extremely important. It will greatly affect the comfort of your shelter and the calories you expend building it. Here are some things to consider:
Running water: Do not site the shelter where there is evidence that water flows through the area. Pay careful attention to this. While it may not be raining when you build the shelter, it very well might rain overnight.
Sheltered environment: Look for a site that makes use of natural shelter. Do not build on a barren windswept hill. Similarly, do not build at the bottom of a gully. Cold air will sink into the gully and make it more difficult to stay warm. Look for natural windbreaks and make use of friendly terrain.
Near materials: It is very important to build the shelter near natural construction materials. You do not want to walk a great distance to find materials for your shelter. It expends a tremendous amount of energy and greatly increases construction time.
Widowmakers: When choosing your site, don’t forget to look up. Be wary of large tree limbs on the ground and try to determine if the trees overhead are likely to drop their branches. You do not want to get brained in the middle of the night by a falling tree limb.
Game trails: Site your shelter away from game trails. You do not want curious animals visiting your shelter in the night.
Creating the structure
The structure of the debris hut is an A-frame. One edge of a ridge pole is suspended above the ground by supports. The other end rests on the ground or a rock. See the diagram below for the most common configuration.
You can support the end of the ridge pole in a variety of ways. The most common method is to create supports from two sturdy branches. I do this by digging two small holes in the ground using a digging stick. These holes define the width of my shelter opening. I place one end of each branch into the holes. If I have a knife, I sometimes point the ends of the branches that go into the holes. I angle the branches so that they intersect about the height of my waist. Again, it is important to minimize the volume of the structure by keeping it as small as possible. Secure the two branches at the intersection using a square lashing. I abide by the motto, “wrap thrice, frap twice”. I use a clove hitch to finish the lashing, but I usually add a “safety” knot because this lashing supports the ridge pole I will be sleeping under.
The lashing requires cordage. Although you can make your own, it is far easier to always carry some form of cordage with you in the outdoors. I carry 550 paracord, but simple twine works just as well. In fact, I have stood on a ridgepole supported by a lashing of twine.
Another method of supporting the ridgepole is to place it in the crook of a tree. The advantage of this approach is that it does not require cordage, or the need to tie a lashing. It is also simple and easy. Depending on the width of the tree’s trunk, you may have to relocate the door from the end of the shelter to the side of the shelter. I have used shelters like this and have no problems getting in or out. But larger individuals sometimes have trouble entering a debris hut through a side door.
I do not place the unsupported end of the ridge pole on the ground. Instead, I find a large rock and rest the pole on it. This creates more useable volume. If the end of the pole rests on the ground, there is space at the end of the shelter too low to accommodate my feet. It is extra volume I would have to heat that does not “pay the rent” by sheltering my body. Make sure the pole and rock are stable so the ridge pole does not fall later in construction.
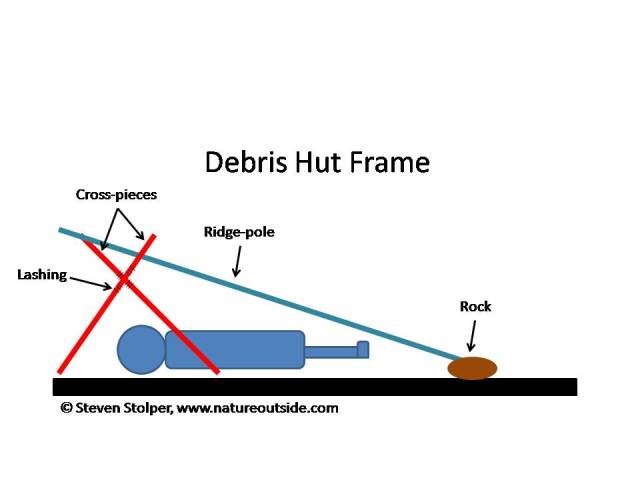
Debris Hut Frame
Interior Insulation
Fill the inside of the shelter with insulating materials. Leafy materials such as dead leaves, pine needles, or grasses are ideal. These act as a blanket, trapping air against your body, which heats it. When you enter the shelter, insert yourself into the middle of the insulation. The material below insulates your body from the ground. The material above insulates you from the air.
That your body is in contact with the insulating material may seem counterintuitive since conduction moves heat away from the body faster than convection. But the layer of air trapped against your body more than compensates for conductive losses. I have slept overnight in shelters both in and out of the interior insulation. Using insulation is the way to go.
Place the insulation in the shelter before adding the roof.
I work in an office during the week. As a result, my hands are not conditioned for hard outdoor work. I keep a lightweight pair of leather gloves in my daypack to assist me in emergency tasks like building a debris hut. They make a big difference! I work faster and more efficiently when wearing the gloves. You can find an inexpensive lightweight pair at your local home improvement store.
It is better if you can move a lot of insulating material to your debris hut with each trip to the surrounding forest. You can use your empty backpack, a towel, or clothing to help carry a lot of insulating material. This improves your efficiency so you burn fewer calories. It also speeds construction. Both of these greatly buoy morale during construction.
Laying the Ribs and Cross-pieces
The next step is to lay structural “ribs” against the ridge pole (See diagram). The ribs provide support for the outer layer of insulating materials. Lay the ends of lightweight branches on the ground. Lean them against the ridge pole, about one foot apart. You can lay the ribs closer together if you have the material to do so.
It is very important that you do not let the ribs stick up above ridge pole. If they do, they will channel water onto the top of the pole. Once there, the water will find its way to the bottom of the ridge pole and then drip on you!
After the ribs are in place, lay smaller branches (twigs) across the ribs to form a framework/lattice. The twigs should span the gaps between the ribs. Start at ground level and rest the bottoms of the twigs on the ground. Then place the next layer higher up on the structure and let gravity hold the twigs in place.
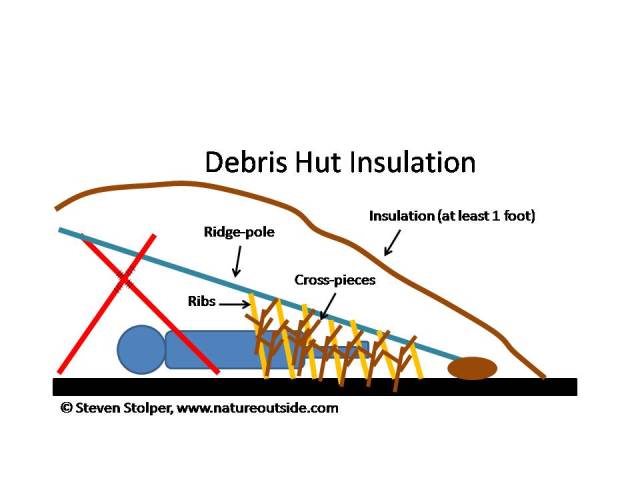
Debris Hut Structure and Insulation
Outside Insulation
The outer layer insulates the shelter from the elements. It consists of leaves, pine needles, etc. piled onto our lattice work.
This is where people often skimp on materials. But don’t fall prey to temptation! You may be fatigued by this point in the construction. But when you sleep in a natural shelter, either it will protect you or it will not. Putting just enough outer insulation to make it look pretty will not keep you warm and dry on a wet, chilly night.
The outer insulation should be at least one foot thick. Two feet is even better! This is what is needed to keep you warm and dry. Pile on the insulation. When you think you have enough, add more.
Once you are done adding the outer layer, place medium sized branches over it. This is to hold the insulation on the shelter during high winds. It takes a lot of wind to pick up a branch and fling it through the air. So adding the branches effectively keeps the roof from blowing off your shelter during the night.
Making the Door
You can construct a door for your shelter by creating two frames of sticks. Each frame is constructed by lashing the sticks together. Weave smaller branches through each frame using friction to hold them in place. When the frames are completed, lay one on the ground and pile leaves on it. Then place the other frame on top, creating an “insulation sandwich”. Lash the two frames together and you have your door. For practice, I usually get lazy and drape a wool blanket over the shelter to act as a door.
The other thing I do at this point is make an “entranceway” to break the wind. These are “shoulders” that extend the sides of the shelter beyond the door. This acts as a windbreak and keeps the shelter warmer.
If you have used a large tree to support your ridge pole, your doorway may be a side entrance. All of the same steps apply in making the door. But you must ensure that all of the insulation above the door remains in place when you enter and leave the shelter.
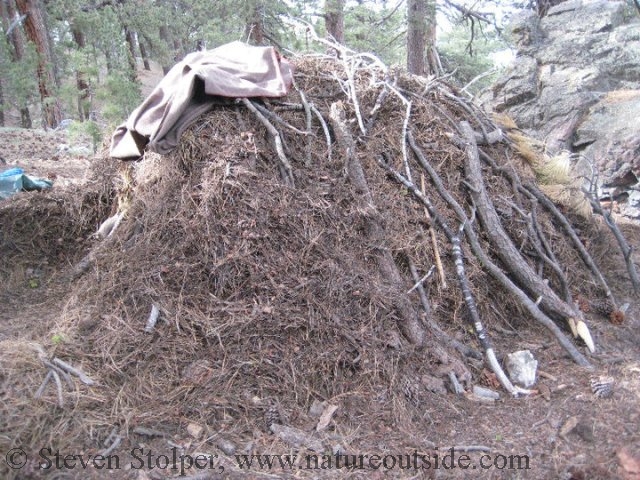
Visibility
Debris shelters are made of natural materials. So they tend to blend into the environment. See the example below and notice how well the shelter becomes a part of its natural surroundings. If we were constructing our debris hut as an emergency shelter, we would want to make it as visible to searchers as possible. Keep this in mind and consider hanging something bright outside the shelter to attract the attention of rescuers. I carry a small amount of iridescent surveyor’s tape that I can hang from a tree branch driven into the ground next to my shelter.
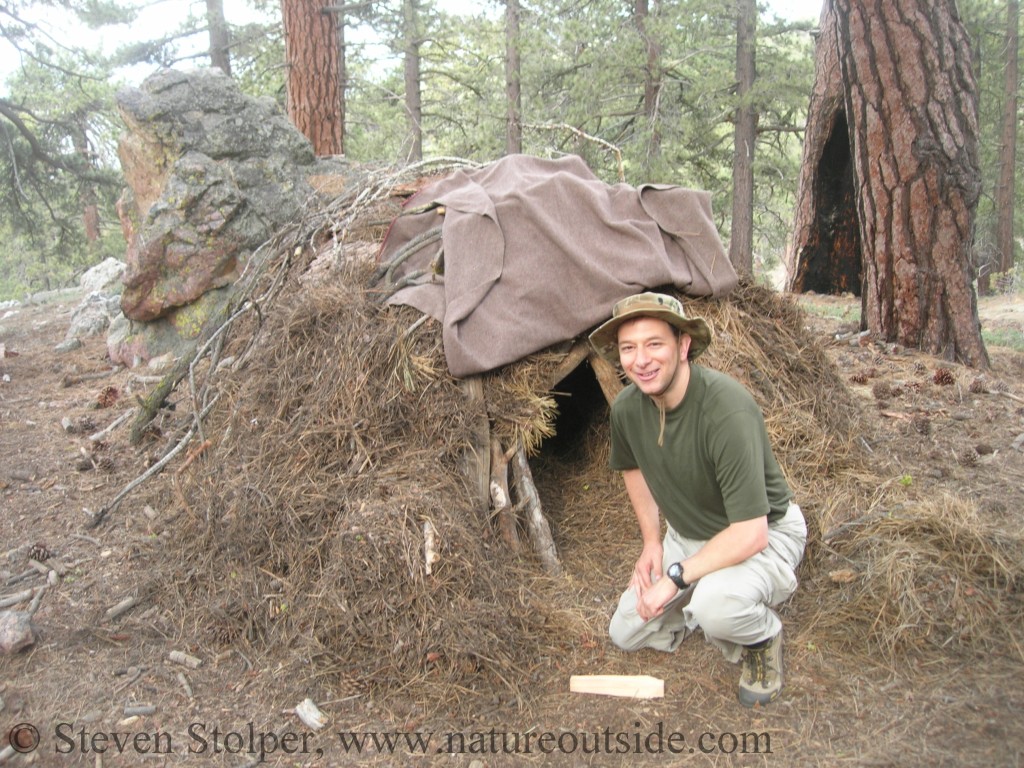
Example
Here is an example debris hut I constructed as a student in a wilderness skills course. Each student had to build a debris hut .5 miles from the main camp and spend the night in it. I was eager to sleep in the shelter because I figured it was the most “controlled” solo night out I was ever going to get. I left the class’ camp as the sun was setting. The grinning instructors’ last words of encouragement were: “Don’t worry! We have been teaching this class for more than 20 years. We hardly ever have bears drag students out of their shelters!” 😯
The environment was pine forest, around 6,000′ elevation, at the end of July. Cold and rain were the elements I was most concerned about. It did rain the second night.
Debris Hut Entrance
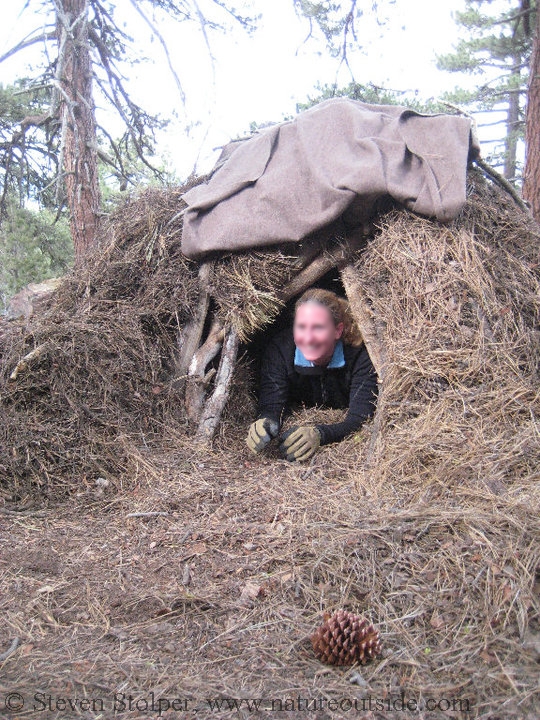
Debris Hut Entrance Shown for Scale
Debris Hut Side, Notice “Entrance” Acting as Windbreak
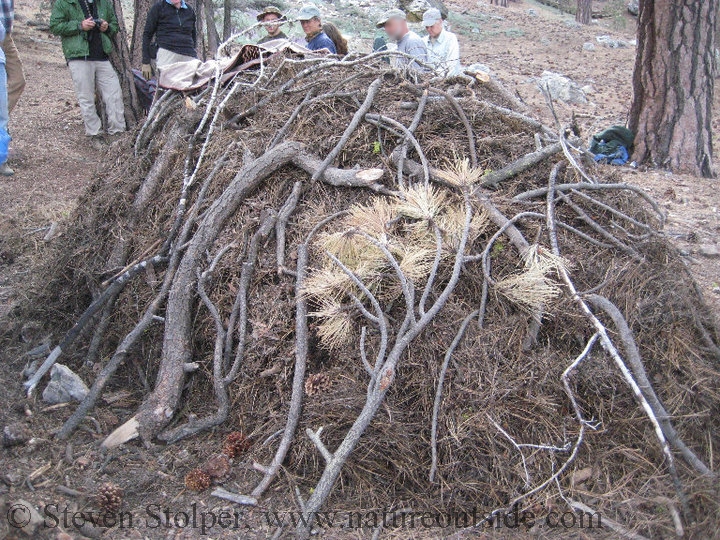
Debris Hut, branches weigh down the roof insulation
Construction details:
- Enclosed smallest volume possible to conserve body heat
- Supporting poles tied with twine. I had not realized it was so strong!
- Ridge pole was not placed directly on ground. Placed on large rock. This permitted room for feet at back. Allowed efficient use of interior space.
- Entire inside volume filled with pine needles. This was done before roof added.
- I wedged myself into the pile of pine needles when I climbed in. Insulation was great and I was actually a bit warm at first.
- Roof was more than a foot thick with pine needles over the structural ribs.
- Small branches placed over pine needle roof to keep the roof on in high winds
- Created a small “entranceway” to shield the opening from the wind
- Used wool blanket for door — I got lazy. 🙂
Lessons Learned
There are several things I learned from constructing debris huts. The first is gratitude for modern materials – particularly plastic! Plastic is lightweight, windproof, and waterproof. It is a wonderful roofing material.
I carry a small sil-nylon tarp in my daypack. It is extremely lightweight and permits me to construct a waterproof shelter quickly without expending calories building a debris hut. A lower cost alternative is a bright orange heavy duty trash bag. This can be cut with a knife to make a large plastic sheet that can be hung over a ridge line or ridge pole.
I also carry man-made cordage. It is a multi-use item and can be used to suspend my sil-nylon tarp, or to lash the frame of a debris hut. In addition, I carry lightweight leather gloves.
But should I lose one or more of these items, I know I can always build my shelter solely from materials on-hand.
Share your Thoughts
Have you built a debris hut? Have you slept in one? What have you learned from the experience?
If you enjoyed reading this post, you may want to read others in the Skills Section.
Bushcraft Knife Safety – 9 Tips to Avoid Accidents
How to Make a Wilderness Candle
For fun facts and useful tips, join the free Bushcraft Newsletter.


hi Steve,
I am really enjoying browsing through your website. Just read through “how to build a debris hut” and thoroughly enjoyed it. I loved the way you explain things with such clarity and purpose and your organization and writing skills are just amazing.
You will be seeing a lot more of me in the near future so be prepared.
Thank you.
Jumana, thank you for your lovely comments! I’m glad you enjoyed the article.
Most complete instructions I have found on the internet to build a debris hut. Thanks!
I’m glad you like the article, Bryon!
Love ya’lls…………………………………
Thanks, Bobby!
Ive built several in Ky, and spent the night each time. Used mostly leaves for roof and inside. Pine needles on occasion. Only problem Ive had are occasional spider bites. Theyre in the leaves and needles picked up off the ground…If you’re planning a night in a debris hut, spray up good with OFF or some DEET free repellant before bedtime.
Thanks for your comment, Larry! You’re right that biting insects (and in your case arachnids) can be a problem. I treat all my outdoor clothing with permethrin at the start of spring. This seems to work well. I also try to use dry leaves or pine needles if I can find them. That cuts down on the insects. And, of course, it’s important to site the shelter away from ant hills. 🙂
As someone who has been a wanderer because of financial reasons, I can definitely say a tarp and blanket is highly useful and saved time. Yea, you can put debris on top if u wish to insulate.
J, there’s no doubt that carrying modern materials is much easier than building a shelter from natural ones. It’s valuable to build a debris hut just to learn how much effort it takes to do it well.
I have never slept warmly in a debris hut. I have tried at least five times, but I haven’t ever had the motivation to insulate one or more feet thick. The thin roof and probably the rainy weather both added to my lying awake and cold shivering all night.
Hi Findlay! Thank you for sharing your experience.
Thick exterior walls and interior insulation are key. Before I add the roof to my shelters, I fill the inside volume with the insulating material (i.e. pine needles) as described in the article. When I’m done building the shelter, I insert myself into the middle of the insulation. The material below insulates my body from the ground. The material above insulates me from the air. And the foot+ of insulating material that comprises the shelter walls makes it waterproof.
You should still wear all of your insulating layers of clothing inside the shelter. I find that after a short time all the insulation around me captures enough warm air around my body for me to sleep. But it will never feel like Miami Beach when the weather is cold. 🙂
Let me know how it goes on your next debris hut.
great information I did everything you said and my hut turned out perfect
It was so good I slept in it
That’s great Zander! I hope it kept you warm and dry. Keep up the good work!
This is great info that I hope to never have to use! Definitely keeping a tarp in my emergency equipment.
Thank you for your comment, Jacob! It is a lot of fun to build these natural shelters and worth trying, just to have the experience. But in an emergency, a tarp can provide a waterproof shelter without hours of labor to construct it.