
Safe Arrival
I drift through the forest in the fading light. Trees sway with the day’s last breath. As evening falls, their shadows dance like ghosts across the trail.
I pause to observe my surroundings. I must be close to our campsite. The terrain seems familiar, but I can’t be certain. Everything’s muted, shadowy, indistinct.
I gaze upward as I adjust my pack. I need to reach camp before I lose the patches of cobalt sky peeking through the canopy.
There’s nothing to be gained by dawdling. So onward it is.
Woodsmoke.
After ten minutes of hiking the smell of a slow burning fire tells me I’ve arrived. I hear the low murmur of voices. And suddenly a headlamp appears ahead. I’ve found our camp.
Tricks Using the Sun
Finding your way is an important skill in the backcountry. Our ancient ancestors did it using just the earth and sky. Today we have reliable compasses and fancy GPS units. But orienting yourself and judging distance against daylight is still a vital skill. If you can use the sky to do this, you have a valuable outdoor tool in your bag of tricks.
My father was an astronomy teacher. So the nighttime sky is an old friend. Its familiar face tells me if I’m facing north, south, east or west. But most of us hike during the day. And it’s the Sun that helps us find our way.
Below are three simple tricks you can use to quickly orient yourself and judge daylight using the Sun. They’re based on modern geometry and astronomy. So they likely differ from the techniques used by our ancestors. But you can use them to navigate safely to camp, or more importantly, to impress your hiking buddies!
Judging Daylight
Knowing how much daylight remains is helpful when weighing different options on the trail. It can help you choose between trails, or let you know it’s time to turn back.
I like this technique because you use a part of your body to make the approximation. No special equipment required!
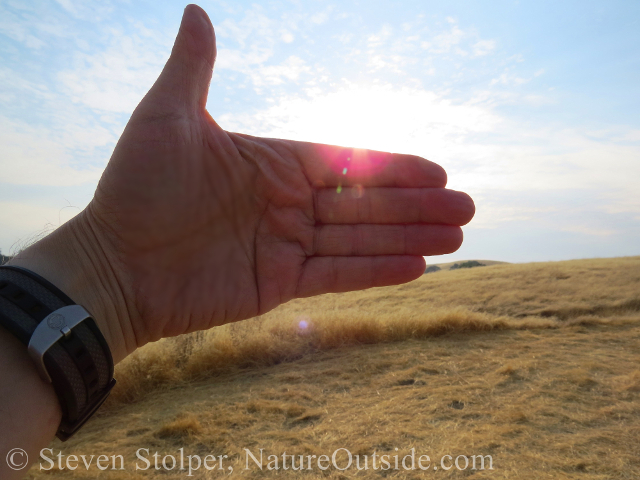
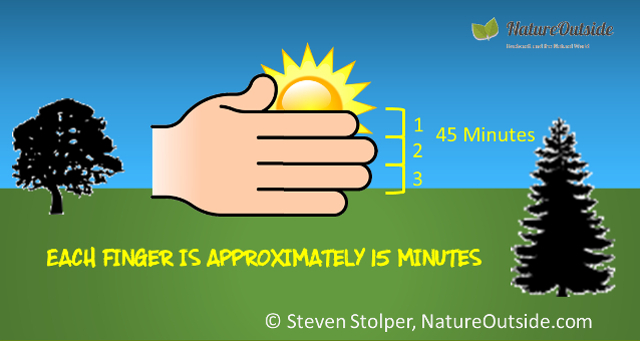
To estimate how much sunlight is left in the day, hold up your hand, fingers together, palm toward your face. Turn your hand so your fingers run parallel to the horizon.
Now place the center of the sun just above the top edge of your pointer finger. Don’t look at the Sun!
Count the number of fingers between the Sun and the horizon. If you can’t see the horizon, you will need to estimate. If you are an adult, each of your fingers represents about 15 minutes of daylight. The number of fingers between the Sun and horizon, multiplied by 15 minutes, tells you the time remaining until sunset.
This trick only works after noon. And I often use it to estimate how much light is left at the end of the day.
Estimating time until sunset.
Here’s the technique in action. If you can’t see the horizon you will need to estimate where it is.
Finding Directions with your watch
Here’s a convenient way to locate the cardinal directions: North, South, East, and West. I use it all the time because it’s so quick and easy. The method differs depending on whether you’re in the Northern or Southern Hemisphere. I cover both methods below.
It’s also important to know that the technique is designed for standard time. So if you use the technique in the summer, in a region that “springs ahead” for daylight savings time, you need to subtract one hour from the local time to make it work.
Bear in mind that this method gives an approximation of true North. It’s not as accurate as using a compass.
Northern Hemisphere
Look at your watch to check the current time. If your watch is set to “Daylight Savings Time,” subtract one hour.
Point your right arm at the Sun. Pretend your arm is the hour hand of a watch (Millennials will need to bear with me). Now point your left arm to the Twelve-O-Clock position, based on the current time.
Turn your body so that you are facing a direction that bisects the angle you just created. NORTH is behind you. You are facing SOUTH.
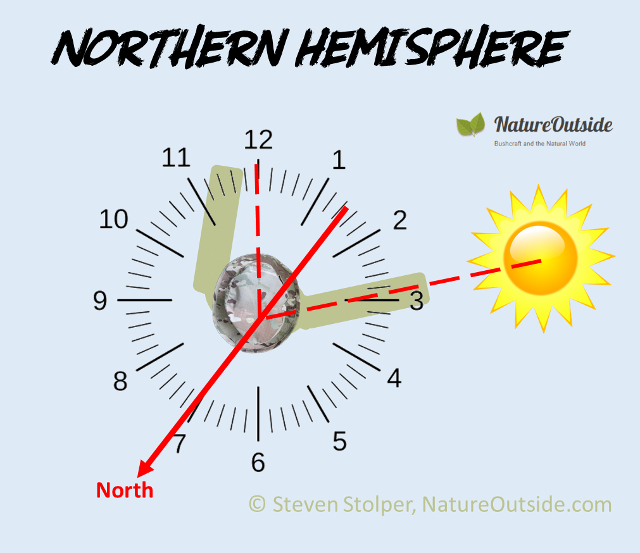
Finding North at 3:00 PM using the Sun (Northern Hemisphere).
Southern Hemisphere
The technique differs for the Southern Hemisphere.
Look at your watch to check the current time. If your watch is set to “Daylight Savings Time,” subtract one hour.
Point your right arm at the Sun. Pretend your arm is the minute hand of a watch pointing at 12 O’Clock (Millennials, are you still with me?). Now point your left arm to the hour position that matches the current time.
Turn your body so that you are facing a direction that bisects the angle you just created. You are facing NORTH.
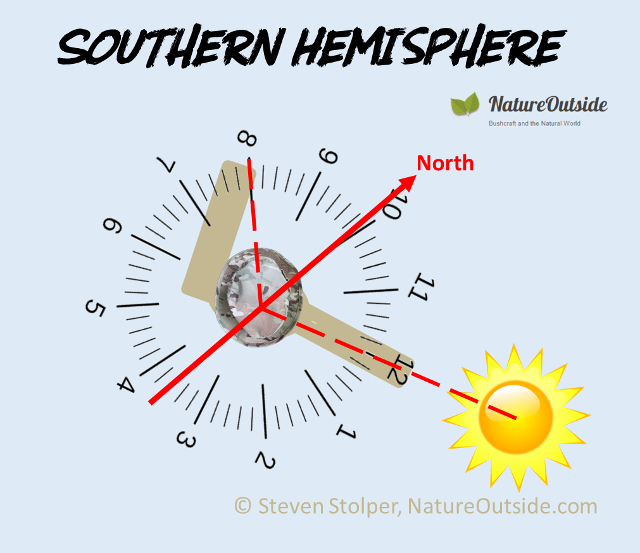
Finding North at 8:00 PM using the Sun (Southern Hemisphere).
Finding Directions with a stick
I don’t use the stick technique as often as the watch technique. The watch technique is faster, and you can make an observation instantly. The stick technique requires about 15 minutes. But the stick technique is more accurate than the watch technique. And you can do it whenever you stop to drink and rest.
You use the same method in both hemispheres. But the shadow you track moves differently in each. So I break-out the two hemispheres only to show different pictures of the end result.
Bear in mind that this method gives an approximation of true North. It’s not as accurate as using a compass.
Northern Hemisphere
Find a stick about 3 feet (1 meter) tall and plant it in the ground, vertically. Make a mark on the ground at the tip of the shadow created by the stick (A).
Wait 15 minutes. As the sun moves across the sky, the tip of the shadow moves by approximately 1.5 – 2.0 inches. If you wait too long, the shadow length changes as the Sun moves to a different elevation in the sky. This can throw off your measurement.
By the way, the shadow will move “clockwise” with respect to NORTH.
At the end of 15 minutes, make a second mark on the ground at the tip of the stick’s shadow (B). If you draw a straight line between A and B, you have an east-west line. Point B always indicates East. You can extend the line to make it easier to use by drawing beyond A or B.
Stand with your left foot on A and your right foot on B. You are facing NORTH.
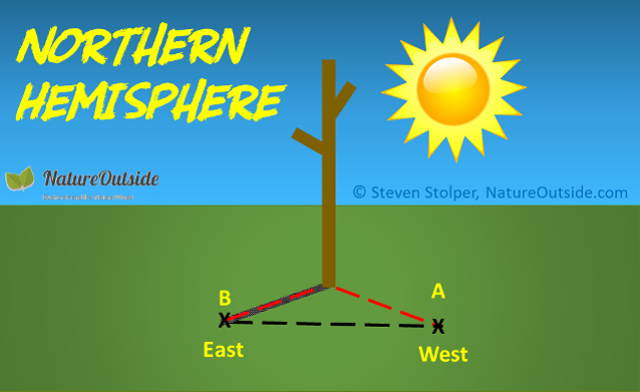
Using a stick and the Sun to find North (Northern Hemisphere).
Southern Hemisphere
You use the same technique in the Southern Hemisphere. Find a stick about 3 feet (1 meter) tall and plant it in the ground, vertically. Make a mark on the ground at the tip of the shadow created by the stick (A).
Wait 15 minutes.
As the sun moves across the sky, the tip of the shadow moves by approximately 1.5 – 2.0 inches. If you wait too long, the shadow length also changes as the Sun moves to a different elevation in the sky. This can throw off your measurement.
By the way, the shadow will move “counter-clockwise” with respect to NORTH.
Make a second mark on the ground at the tip of the stick’s shadow (B). If you draw a straight line between A and B, you have an east-west line. Point B always indicates East. You can extend the line to make it easier to use by drawing beyond A or B.
Stand with your left foot on A and your right foot on B. You are facing NORTH.
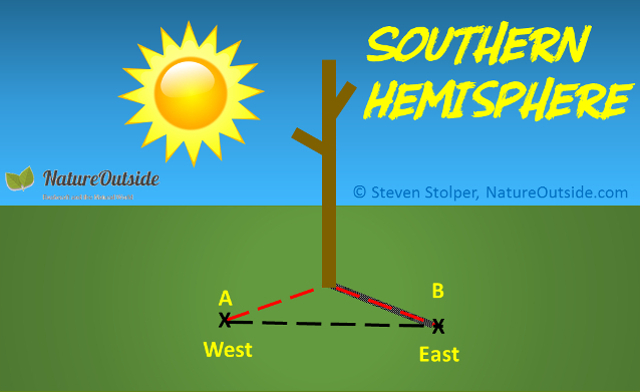
Using a stick and the Sun to find North (Southern Hemisphere).
References
These references contain techniques like the ones I describe here. But I take issue with FM 21-76’s (at least the reprint I have) description of the stick method. It claims different results in the Southern Hemisphere.
US Army Survival Manual FM 21-76
SAS Survival Handbook, John “Lofty” Wiseman
Try these techniques for yourself and tell me about your experience in the comments below.
Related Articles
16 Tips to Stay Cool on the Trail
If you Meet a Mountain Lion – Safety Tips for Hikers
For fun facts and useful tips, join the free Bushcraft Newsletter.


Thanks Steve, Full of good stuff.
Hello Steve,
The stick technique as you describe it is wrong — you mustn’t have used it much because you have gotten lost (this mistake is common on many websites).
The stick technique as you describe it only works at the equinoxes, when the shadow of the stick will give you a straight line, otherwise it is a parabola and it will not point anywhere reliably (unless you get two points symmetrical around noon or get the north direction at noon from the stick itself).
Hey, the stick method you give does not work — just remove it!
Here is a link to the right method:
https://www.quora.com/What-is-the-Indian-circle-method-1?share=1
If you don’t understand it, just don’t pretend you do and don’t give advice that could land someone in the hospital or worse.
Hans
Hans, thank you for your comment. I appreciate the research you’ve put into this method, and your passion for it.
The method in your link is more accurate than the one I describe. However, it requires remaining in place for many hours. That is why I chose not to describe it in this article.
The question about the method described in the article is: Does it provide a good enough approximation in an emergency. This depends on the eccentricity of the parabola you mention. If the stick is approximately 3 feet (1 meter) tall, and you wait about 15 minutes, you should expect to see a line around 2 inches long. This line indicates an east-west direction well-enough. It is not as accurate as the method described in your link. But it is a field expedient that works and does not require being stationary for many hours.
Please try it yourself. For reputable instructions, consult these sources: “FM 21-76 US Army Survival Manual”, p. 11-1 and “SAS Survival Handbook” (Wiseman, p. 356). Wiseman also describes a method similar to the one in your link.
I have indeed become lost temporarily while hiking. But it wasn’t due to the use of these methods. Getting lost happens to everyone, eventually. And the “watch method” along with the “stick method” are valid field expedients to orient yourself.
The most accurate solution is to carry a map and compass as part of our “10 essentials.”
Hi. I just found your site and find your writings very interesting. I do have a question about judging daylight by the sun. I’ve read about this before, but nobody ever says how far from your face your hand should be. This makes a difference because the closer your hand is to your face, the less fingers it takes to fill the space between the sun and the horizon, thus less fifteen minutes markers. Hope this question makes sense. Thanks.
Jane, this is a very insightful question! What you suggest is that, when your hand is closer to your face, each finger covers a larger angular distance. This is true!
How far from your face should your hand be? No farther than arms-length! 🙂
Seriously, you should hold your hand with your arm fully extended.
Since this technique is an approximation, the difference between peoples’ arm-lengths and finger thicknesses is negligible in most cases. It turns out that people with shorter arms tend to have narrower fingers.
An experiment you should try is to use the Internet to find the time of sunset. Then go out in the late afternoon and compare your fingers to your wristwatch. Do they correlate? This will help “calibrate” your fingers so you can feel confident the technique works.