
Simple projects can still be exciting!
Happiness lies in the joy of achievement and the thrill of creative effort.
– Franklin D. Roosevelt
When you start working with leather, you need simple projects that allow you to practice your skills. Something you can do on weekends, in the garage, with a ballgame on the radio droning in the background.
Select your projects with care. If they’re too complex, you may get poor results and become discouraged. If the projects take too long, you risk dropping them in the middle and losing interest.
But choose projects that are useful! Something you can use yourself, or maybe give to friends as gifts. The excitement of working on a project that you know will get used fires the creative juices and gives you energy to work through potential difficulties.
Not for the Kindle Crowd
I stumbled upon the idea of creating leather bookmarks while searching for something to mark a page I’d been reading. 🙂
Making a leather bookmark is a great project to practice your skills. It has a relatively simple shape that can be made more complex if you want. It is utilitarian. You can be decorate it simply or ostentatiously. Use it around the house or give it away as a gift (to people who still read books). It can even be personalized to impress that special someone! 😉
Here is a list of skills that you can practice making a leather bookmark:
- Marking and trimming a pattern
- Creating a groove for stitching
- Punching holes for stitching
- Tooling/stamping/carving
- Gluing
- Edge beveling
- Sanding and slicking
- Dyeing
- Sewing
And if you mess up, who will know? It’s such a small piece of leather that you can easily consign it to the “practice heap” if it doesn’t work out.
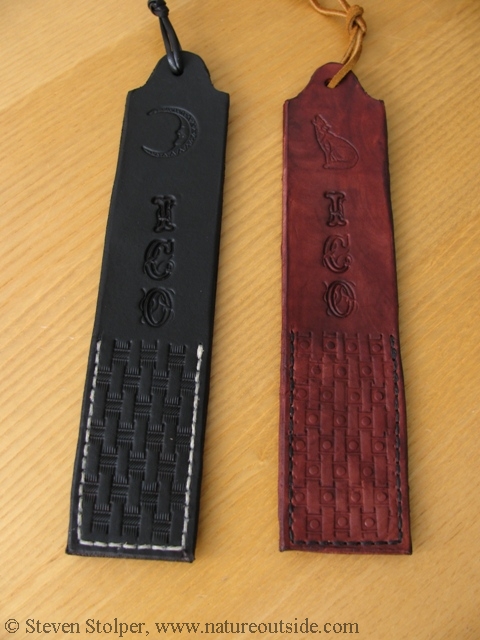
Coyote and Night
Here are two bookmarks I made for a silent auction at a charity event. They were a big hit because bids started at just $5 each. They gave people with small budgets a chance to participate in the auction.
Night (left) and Coyote (right). These are the front of the bookmarks.
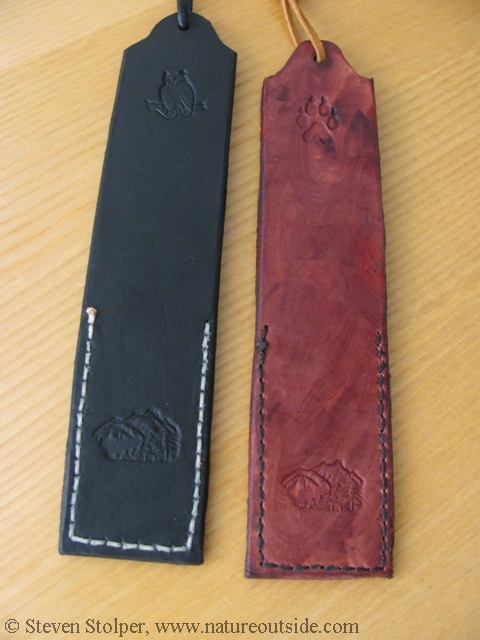
Night (left) and Coyote (right). These are the rear of the bookmarks.
The bookmarks are themed.
Night – A “man in the moon” and owl decorate this bookmark. Black dye completes the night theme.
Coyote – A howling coyote and a canine track capture the spirit of the west. An uneven (dark/light) application of burgundy dye accentuates the look.
Steps
I am not going to provide a step-by-step tutorial for each technique. To learn leatherworking techniques start with the great free videos from Tandy Leather on the internet.
1. Mark and Cut the pattern onto leather
I recommend using 3-5 oz vegetable tanned leather. I made a template of my shape in cardboard and used it to trace the shape onto the leather. You can trace the shape on the grain side with a stylus, or use a pencil to trace the pattern onto the flesh side. The grain side is the one we tool. The flesh side is the “back” of the leather.
I cut the pattern with a sharp X-Acto knife or craft knife.
You will cut two shapes out of the leather. One will be the front of the bookmark and the other the rear.
2. Create the groove
I like the look when the stitches are inset into the leather. This also protects the stitching against abrasion.
I only do this on the front side of the bookmark. Case (moisten with water) the front piece. Then use a stitching groover to make a U-shaped groove along the perimeter of the bottom third of the front piece. Keep the groove far enough away from the edge of the leather so you can trim the piece if necessary.
3. Punch holes for stitching
Use a punch (there are many choices) to punch holes through the front piece in the groove you just created.
4. Tool/Stamp
Tool the front and rear pieces of the leather. I used the following stamps:
 Night
Night
Coyote
5. Bevel the edge of both pieces
To add a more sophisticated look to the piece, bevel the edges of both the front and rear pieces. Use an edge beveler to do this. A size 3 beveler will work fine.
6. Glue the two pieces
Glue the front and rear piece together. You want to mate the flesh side of the front to that of the rear. If the pieces don’t exactly match up, it is OK.
7. Trim/sand/slick
After the glue dries, trim the edges with your knife. Ideally, you want to trim material off of the rear piece because the front has the grooves. Once trimmed, use a rough grain sandpaper to sand the edges of the bookmark. When the edges become smooth, moisten them with water. Then use an edge slicker to produce a smooth, professional looking edge.
8. Punch the stitching holes again
Now that you have mated the two pieces, punch the stitching holes in the rear piece by punching through the holes on the front piece.
9. Punch the center hole
Use a punch to create a hole in the center-top of your bookmark. I use a round punch to do this. The hole is for the decorative tassel we will attach later.
10. Dye the leather
Use any leather dye you want to add color to the bookmark.
11. Sew the bookmark
Sew the bottom third of the bookmark. Practice the saddle-stitch. The sewing is for decorative purposes and can be skipped completely if you do not want the practice or the look of the thread.
12. Add the tassel
The final step is to add a tassel. The tassel often droops from the top of the book and makes it easy to grab the bookmark. I use a high quality leather lace for the tassel.
The Importance of Practice
When you learn to play a musical instrument, most of your time is spent learning the mechanics of playing proper notes. But once you master these skills, you can begin to weave them creatively into melodies and harmonies. Playing the notes correctly becomes second nature. The excitement and challenge comes from using the notes to express your creativity.
Leatherwork is much the same. Practice the rudiments of tooling, stitching, and dyeing, until they become second nature. Then start using them creatively to express your individuality.
Have fun practicing your skills! Don’t worry how “good” your pieces look when you’re done. Any mistakes you make are uniquely yours and add to the “handmade” quality of the finished product. Exercise your creativity and see what kind of fantastic bookmarks you can create.
Show Us Your Bookmarks
If you send me pictures of your bookmarks, I will add them to the bottom of this post for the world to enjoy!
More Practice
How to Make a Deerskin Pouch – 5 Easy Steps!
Beginner Leatherworking Project
Earth Day Project 2014 – The Bottle Bag
For fun facts and useful tips, join the free Bushcraft Newsletter.


Leave a Comment